Posts tagged DIY home
DIY Before and After :: Brass Bed Frame Makeover
Anna Osgoodby Life + Biz :: DIY Before and After Brass Bed Frame Makeover | Brass Headboard DIY Makeover | DIY Project | Home DIY | DIY Blog

One of my favorite things of being a homeowner is having the space to take on BIGGER DIY projects. It’s amazing how much more you can do when you have an actual outdoor space and a garage… say WHAT!

When I moved back to Washington 3 years ago, I was starting over on the furniture front and was trying to keep things on a budget after a big and expensive move too. Queue Pinterest and another one of my favorite things, Facebook Buy Sell Groups and Marketplace! Which feels a smidge safer than Craigslist? I’m sure there are creepers there too but this post isn’t about that! It’s about…. how I snagged a bed frame for $25 and did some DIY furniture magic on it!

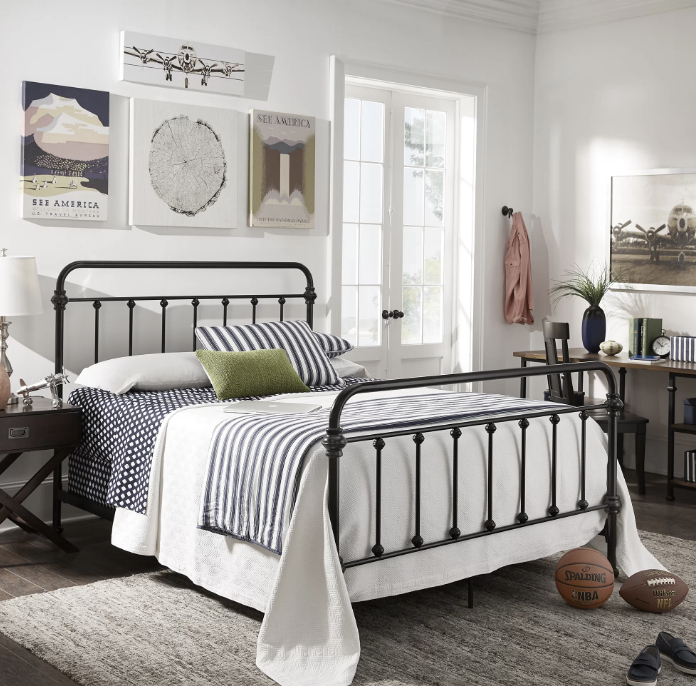
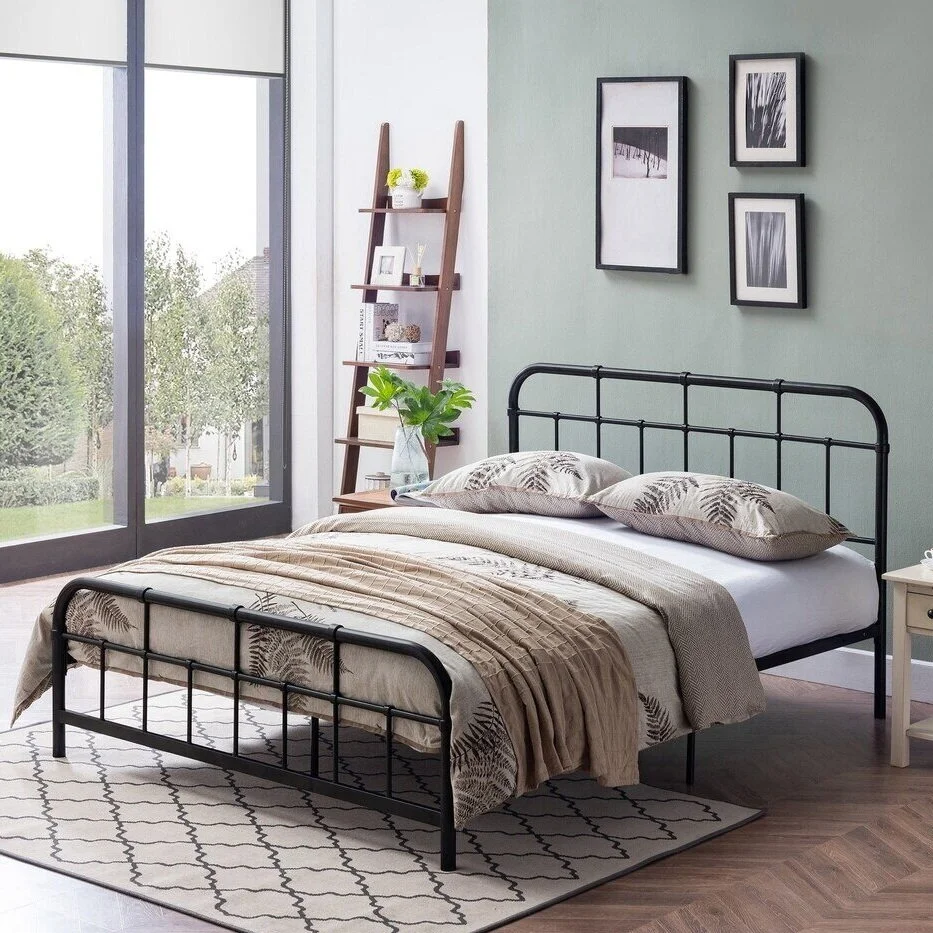
Let me back up a few though, this all started because I really loved the look of industrial style bed frames. When I was looking to buy one though the prices started at $300 and went all the way over $1k! Ones similar to these…

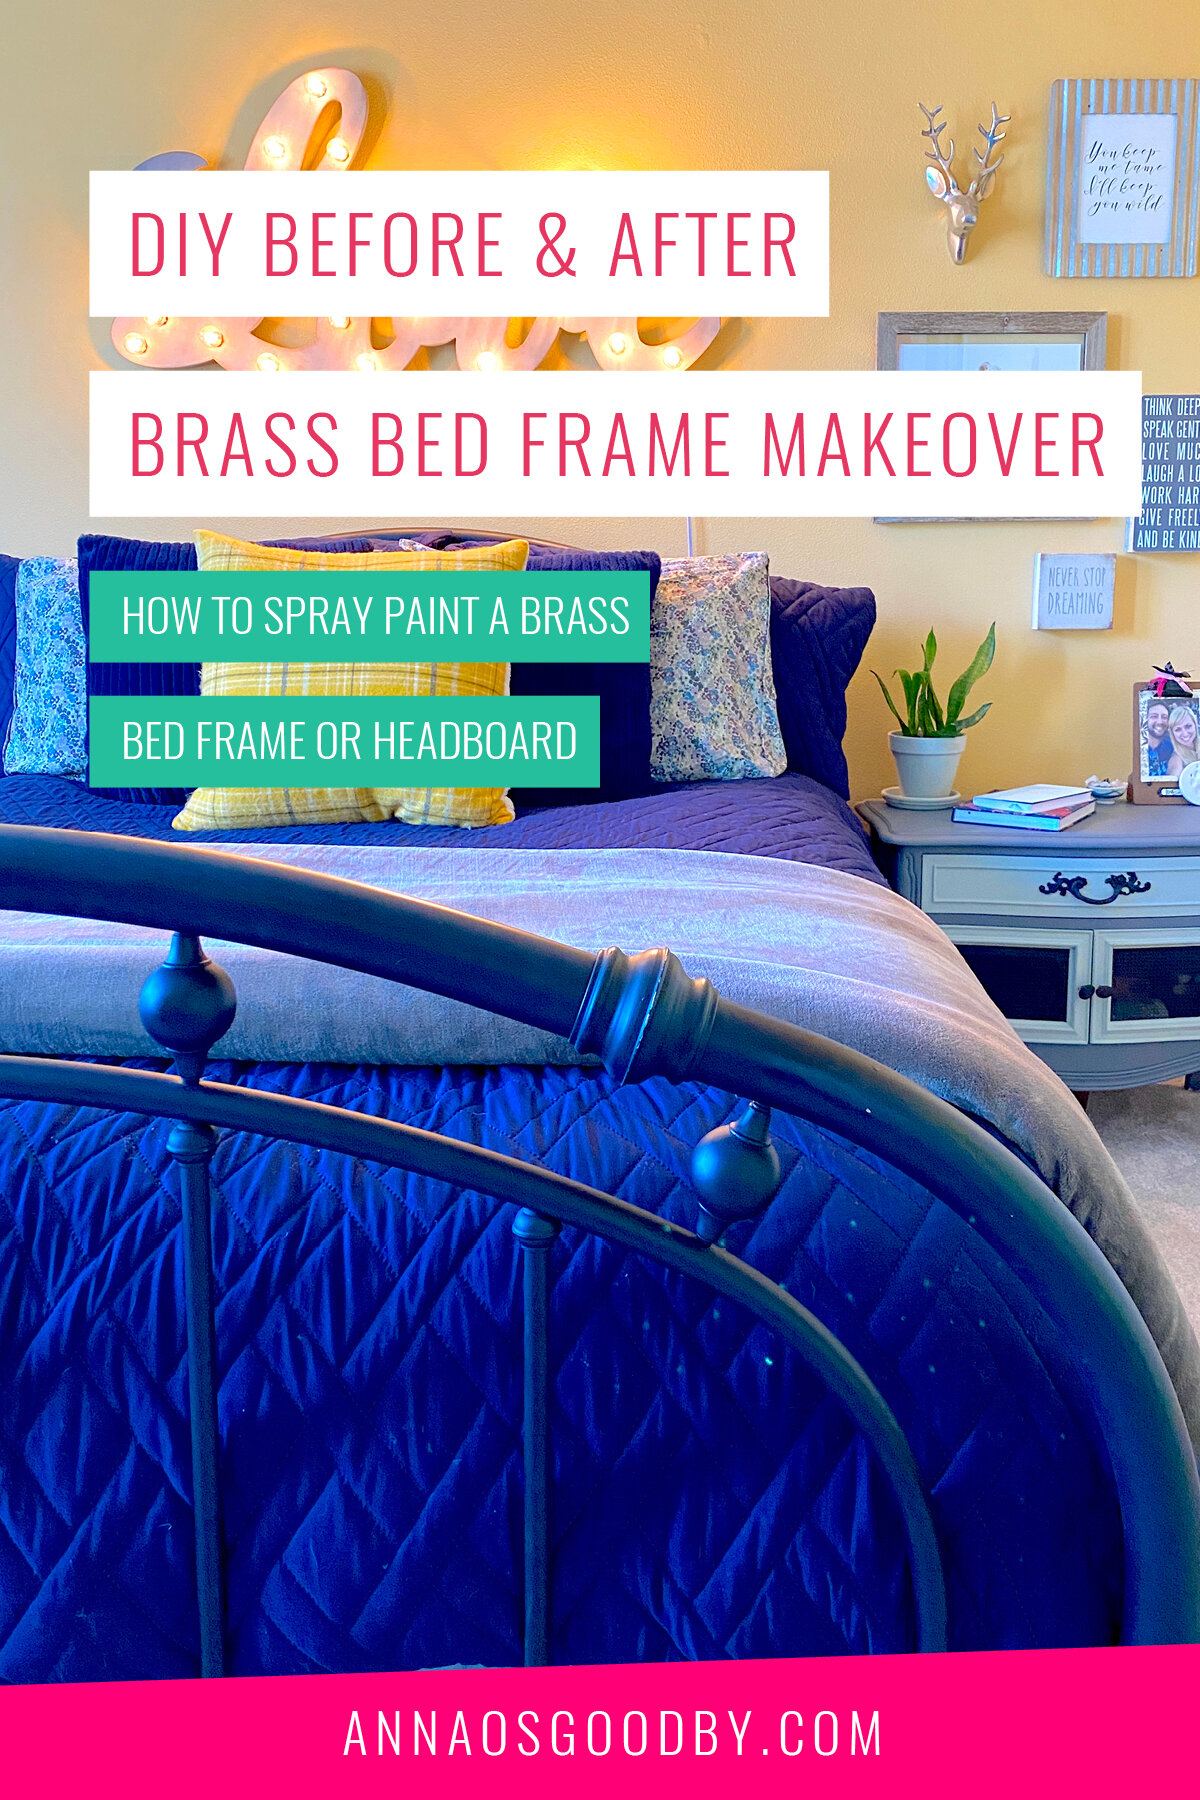
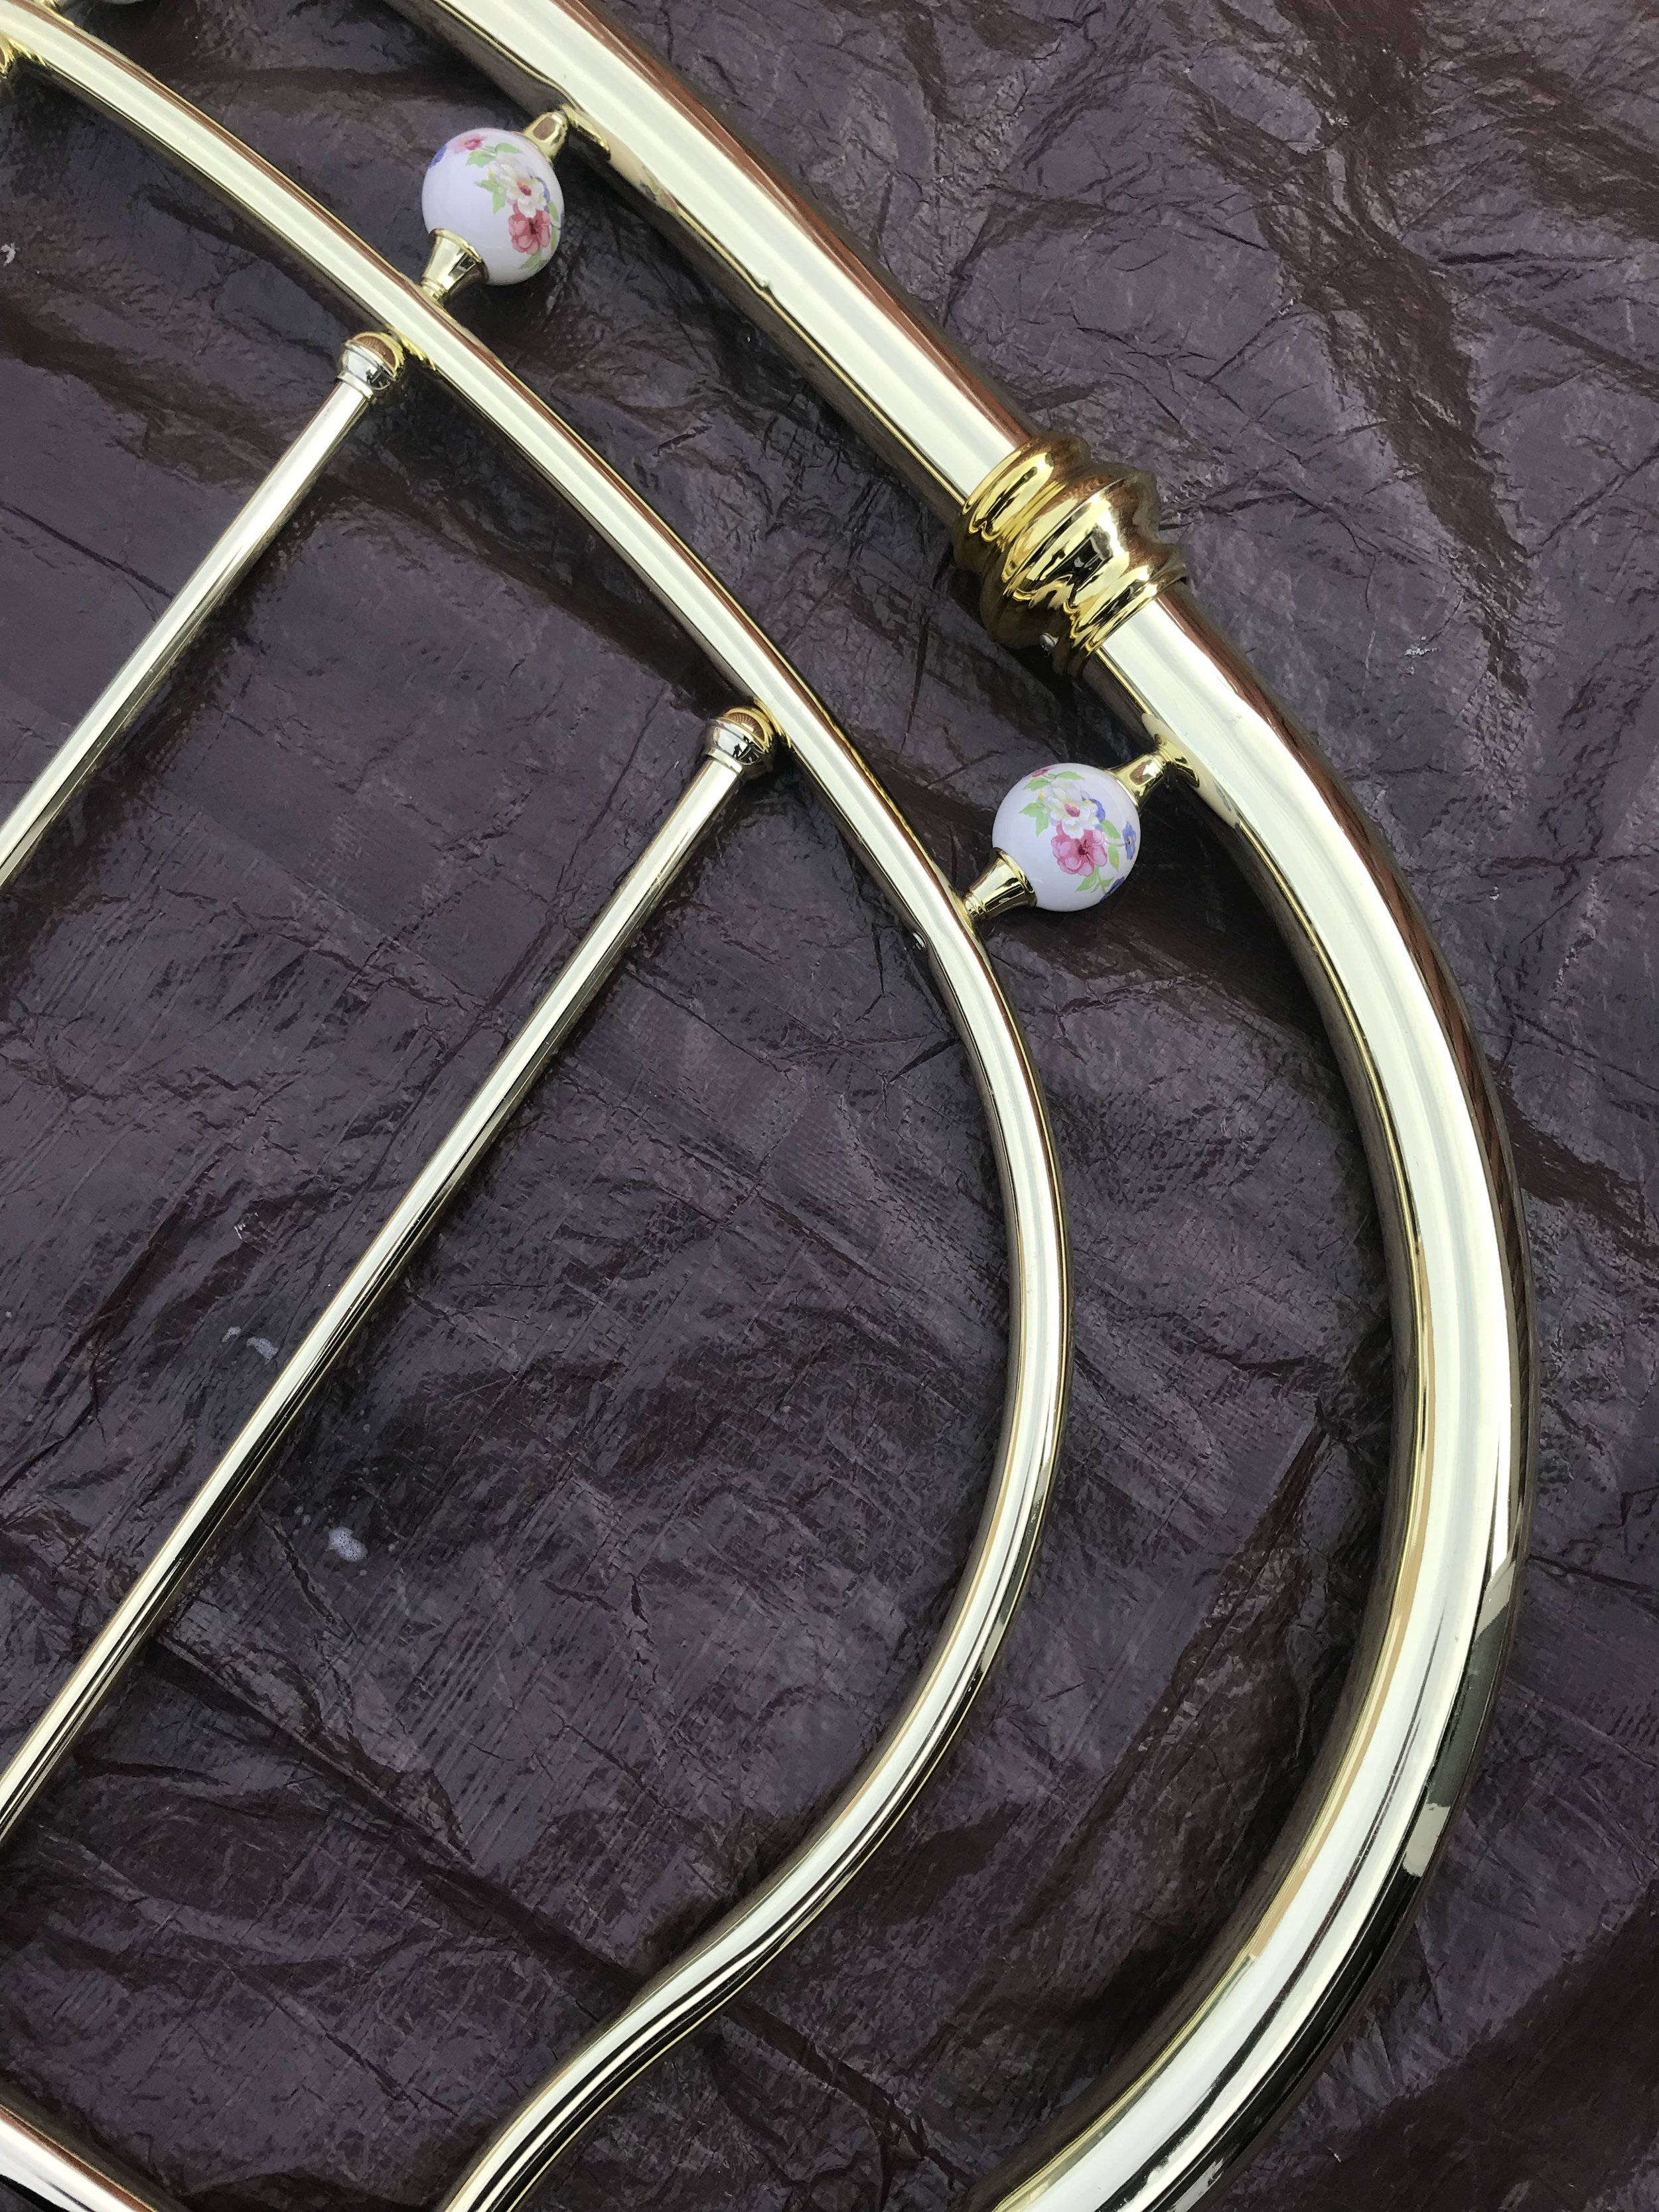
Of course, I didn’t want to spend that though… so I spent some time on Pinterest and found some tutorials of people who had spray painted brass bed frames to get the same look. Ding, ding, ding I could totally do that! So I started looking on Facebook Marketplace and I quickly found this beauty for a whopping $25! Which looked like a lot of my friend’s bed frames growing up! Of course there’s nothing wrong with this look if that’s your thing, but for me it was a stepping stone to getting that industrial vibes I was after.

Anna Osgoodby Life + Biz :: DIY Before and After Brass Bed Frame Makeover | Brass Headboard DIY Makeover | DIY Project | Home DIY | DIY Blog

To get the look I wanted, I opted for a flat black spray paint from Krylon. I usually go with the all-in-one spray paints so that I can skip the separate primer coat, which saves some time. If you go with a traditional spray paint can, I also highly recommend getting one of the comfort nozzle too. SO worth the extra little money to save your fingers. Plus you can reuse them for future projects.

Anna Osgoodby Life + Biz :: DIY Before and After Brass Bed Frame Makeover | Brass Headboard DIY Makeover | DIY Project | Home DIY | DIY Blog

Two coats on each side later they turned out like this! Which, in case you’re wondering was 4 cans of spray paint. I wanted to make sure it was covered well.

Anna Osgoodby Life + Biz :: DIY Before and After Brass Bed Frame Makeover | Brass Headboard DIY Makeover | DIY Project | Home DIY | DIY Blog

I’d say I achieved the look I was going for! What do you think? The best part too? I didn’t spend hundreds of dollars… in fact the whole project came in right under $40! Of course, your price will vary a little depending on if you have a bed frame around the house or buy one. Either way, though it’s an inexpensive project that can totally change the look of your bedroom!

Anna Osgoodby Life + Biz :: DIY Before and After Brass Bed Frame Makeover | Brass Headboard DIY Makeover | DIY Project | Home DIY | DIY Blog
Home Tour :: Colorful Small Backyard Tour
Anna Osgoodby Life + Biz :: Home Tour :: Backyard Makeover Tour | Colorful Small Backyard Maximizing Space

This post contains affiliate links for your convenience which means if you purchase something I recommend I may receive a commission at no additional cost to you.

One of the reasons I fell in love with our townhouse when we first looked at it was the outdoor space! Boy have I been thankful we’ve had it during the pandemic too… Being able to eat dinner outside, read a book or get some fresh air while working… it’s been a blessing that’s for sure! Since we’ve been spending A LOT more time at home this summer than we had planned too I’ve been really focused… ahem, obsessed… with making the most of the space. All without spending an arm or a leg because ish is a little nuts right now and holy cow can outdoor furniture be expensive! 😳

So now that we’ve officially finished the space, you know I had to share how it turned out! Before we do that though, here’s a few before shots so you can see what we were working with. It’s definitely not a huge space so it was all about designing the space with function, making it fun and keeping that budget in check.

There’s 3 main parts of our outdoor space, the patio, side yard and balcony — all of which needed some help! Throughout the winter and spring we started picking up a few things here or there, including our patio set that we got for a steal right after Christmas. I’m talking half the price! For the most part though, we needed to furnish all 3 areas.

The Patio

The one thing we had to start was our 4-piece conversation patio set! So we weren’t totally starting from scratch on this space. Evan also really had his heart set on getting a fire pit for the backyard. Our backyard is super tight so we definitely couldn’t have wood-burning ones but found a great propane option that was pretty affordable off of Amazon. Since we got that, we decided to use the table that came with the patio set more as a side table or bench if we need extra seating. If you get a fire pit, I highlight recommend one that has the metal cover too so it’s easy to cover for our many rainy Washington days.

Anna Osgoodby Life + Biz :: Home Tour :: Backyard Makeover Tour | Colorful Small Backyard Maximizing Space

Patio Set: Similar | Outdoor Pillows: Walmart | Outdoor Rug: Similar | Fire Pit: Amazon

Then for a few Costco buys! I had been looking for weeks for outdoor rugs that, again, weren’t ridiculously expensive and Evan found this one at Costco in the exact size we needed for $40 off! I wish I could link that for you guys but they’re out for the season. If you’re in the market for a new one next year though, definitely check them out because the quality is awesome! We had also got one of their outdoor light sets for Christmas that we hung from the fence. We just used little screw hooks on each fence post to keep things simple. The Costco light set is a great deal too because it’s 48-feet and they were less that $50. We ended up needing to get a smaller set to finish off the side yard and even on sale those were $30 and they were only 24-feet. So another thing to add to your Costco list!

Anna Osgoodby Life + Biz :: Home Tour :: Backyard Makeover Tour | Colorful Small Backyard Maximizing Space

BBQ: Lowe’s | Patio Lighting: Similar

Evan’s family also gifted us this amazing BBQ as a housewarming gift! Which has made the backyard 10 times better than any decor we could have done! This is on the other side of the main patio kind of in the corner between the side yard. Then we finished off the space with a few plants, of course! I had got a flat of marigolds for the garden and my flower boxes in the front of the hose so we filled up a few more pots with those and then Evan really wanted to get a Japanese Maple tree in honor of Scoots so he picked up that little guy! In a few years it will probably be the perfect height to fill up that space too.

The Balcony

For the balcony, we decided to keep things really simple and keep that budget in check. I went back and forth on some different options but decided to save on this portion and we went with a few stackable chairs from Home Depot. Then I added a little signature Anna color to the space with an outdoor mat and some throw pillows I found at Michaels on clearance. Evan also found the side table on clearance which finished up the space perfectly! Now we can enjoy weekend mornings out there watching the hummingbirds.

Anna Osgoodby Life + Biz :: Home Tour :: Backyard Makeover Tour | Colorful Small Backyard Maximizing Space

3 Piece Patio Conversation Set: Rattan Set Amazon | Rocking Chair Set: Amazon

Anna Osgoodby Life + Biz :: Home Tour :: Backyard Makeover Tour | Colorful Small Backyard Maximizing Space

The Side Yard

This one was the toughest part! I was so torn on what to do with this space. The side yard is pretty narrow — I’m talking 5 feet across so we definitely didn’t have too much space. I also didn’t want the space to just go to waste though! I must have went back and forth on 10 different ideas before finding reasons why they wouldn't work. After running through so many ideas, I had just decided to leave it as is for a dog run for Benji and figure something out next year 🙈. Evan knew I really wanted to do something with it though so for our anniversary he decided he was going to makeover the space for me!

The one thing I was really hoping for that space was having a place to lay down especially because it’s shaded over there for a lot of the day. Originally I was thinking a hammock, but we ran into the prob of the stands being too big and there’s concrete poured below so we wouldn’t be able to dig up for posts — like I said, so many ideas squashed! All that being said, he decided to build me an oversized bench! Then we had also gotten some pavers from my sister that they weren’t using so he put those in place, leveled out the space with more gravel and even got a little patch of grass for the corner for Benji!

Anna Osgoodby Life + Biz :: Home Tour :: Backyard Makeover Tour | Colorful Small Backyard Maximizing Space

Pavers: Home Depot | Pea Gravel: Home Depot | Large Pillows: Lowe's | Standard Pillows: Similar & Similar | Chaise Cushions: Lowe's | Cinder Blocks: Home Depot | Landscape Divider: Lowe's

The bench is 8 ft long and a little more than 2 feet across so plenty of space to lay down! We found a few different simple designs on Pinterest that we liked that were simple and didn’t involve too much construction. He built it out of interlocking cinder blocks and then some wood for the top part that he stained and sealed. Then to finish it off, I bought some cushions to make it extra cozy!

Anna Osgoodby Life + Biz :: Home Tour :: Backyard Makeover Tour | Colorful Small Backyard Maximizing Space
IMG_0951.jpeg
Anna Osgoodby Life + Biz :: Home Tour :: Backyard Makeover Tour | Colorful Small Backyard Maximizing Space

Since he made the bench, the size was a little bigger than most of the standard cushions so I ended up getting two chaise lounge cushions and then a few big outdoor pillows to mix in with some others I had already bought. All of the cushions and pillows were on clearance too so it was a major score! Can you believe those big pillows were only $13?! On top of the other smaller ones I got at Michaels for $7 a pop! If you’ve ever shopped for outdoor pillows you know that’s a steal!

Anna Osgoodby Life + Biz :: Home Tour :: Backyard Makeover Tour | Colorful Small Backyard Maximizing Space

Here’s a look from above too so you can really see we weren’t working with a lot of space there! overall I am SO dang happy with how the space turned out. I knew Evan would do a great job but it really exceeded my expectations and I’m so excited to spend more time in the backyard now that summer weather has finally arrived in Washington!

Shop the backyard