3 of the Best WeWork Locations in NYC
Anna Osgoodby Life + Design :: 3 of the Best WeWork Locations in NYC

While I absolutely love working at home -- heyyy commuting from my bed to my desk is MUCH easier than battling people on the subway -- I do enjoy getting out once in awhile. You know, because while I love my trusty assistant Scoots, sometimes it's good to get in some of that human interaction thing. Luckily for me, NYC is full of other entrepreneurs and go-getters, which is one of my favorite things about the city. To go along with that, there are also some really awesome co-working spaces -- one of my favorites being WeWork.

Depending on where you live, you may already be familiar with WeWork (and if you aren’t yet, they’re quickly taking over the world in coworking spaces so you will probably soon). The company offers collaborative workspace that caters to freelancers, entrepreneurs, and small businesses and offers everything from shared common spaces, monthly dedicated desks, or small offices. They also have an amazing social network available to members worldwide which has been a game changer for my business. There's a number of membership options depending on what you're looking for and I found their We Membership was just what I was looking for. As I mentioned, I actually really like working from home but sometimes I just need a change of scenery.

Anna Osgoodby Life + Design :: 3 of the Best WeWork Locations in NYC

With my We Membership, I'm able to have access to their network and also get one day of workspace included each month that I can use at any of their locations worldwide. And if I want additional work days? I can purchase additional credits to fit my needs. Since I'm not tied down to a specific location, I've had a lot of fun adventuring through the city and trying different spaces out. Right now there is 36 locations in New York City, but that number might jump tomorrow! I'm serious, these guys are really taking over the world. While I haven't made it to all 36 just yet, I've made it to quite a few and already have a few favorites. So here you go!

Grand Central

This location is one of my favorites for a few reasons. The location is really easy to get to from the Upper East Side and really just about anywhere.. it is Grand Central! The common space is also very large so there's plenty of space to work with others. They also have the most beer taps that I've seen at a location. Not a terrible thing to have after 5pm right?!

Chelsea HQ

Talking about big common spaces, Chelsea takes the cake on this one. Probably because it's the WeWork HQ location. Out of all of the locations, I've spent the most time at this location because I did a series of recording sessions for iHeartRadio and Work Radio and their recording studio is at this location. This location is also great because there are a lot of long tables and you're never too far from an outlet.
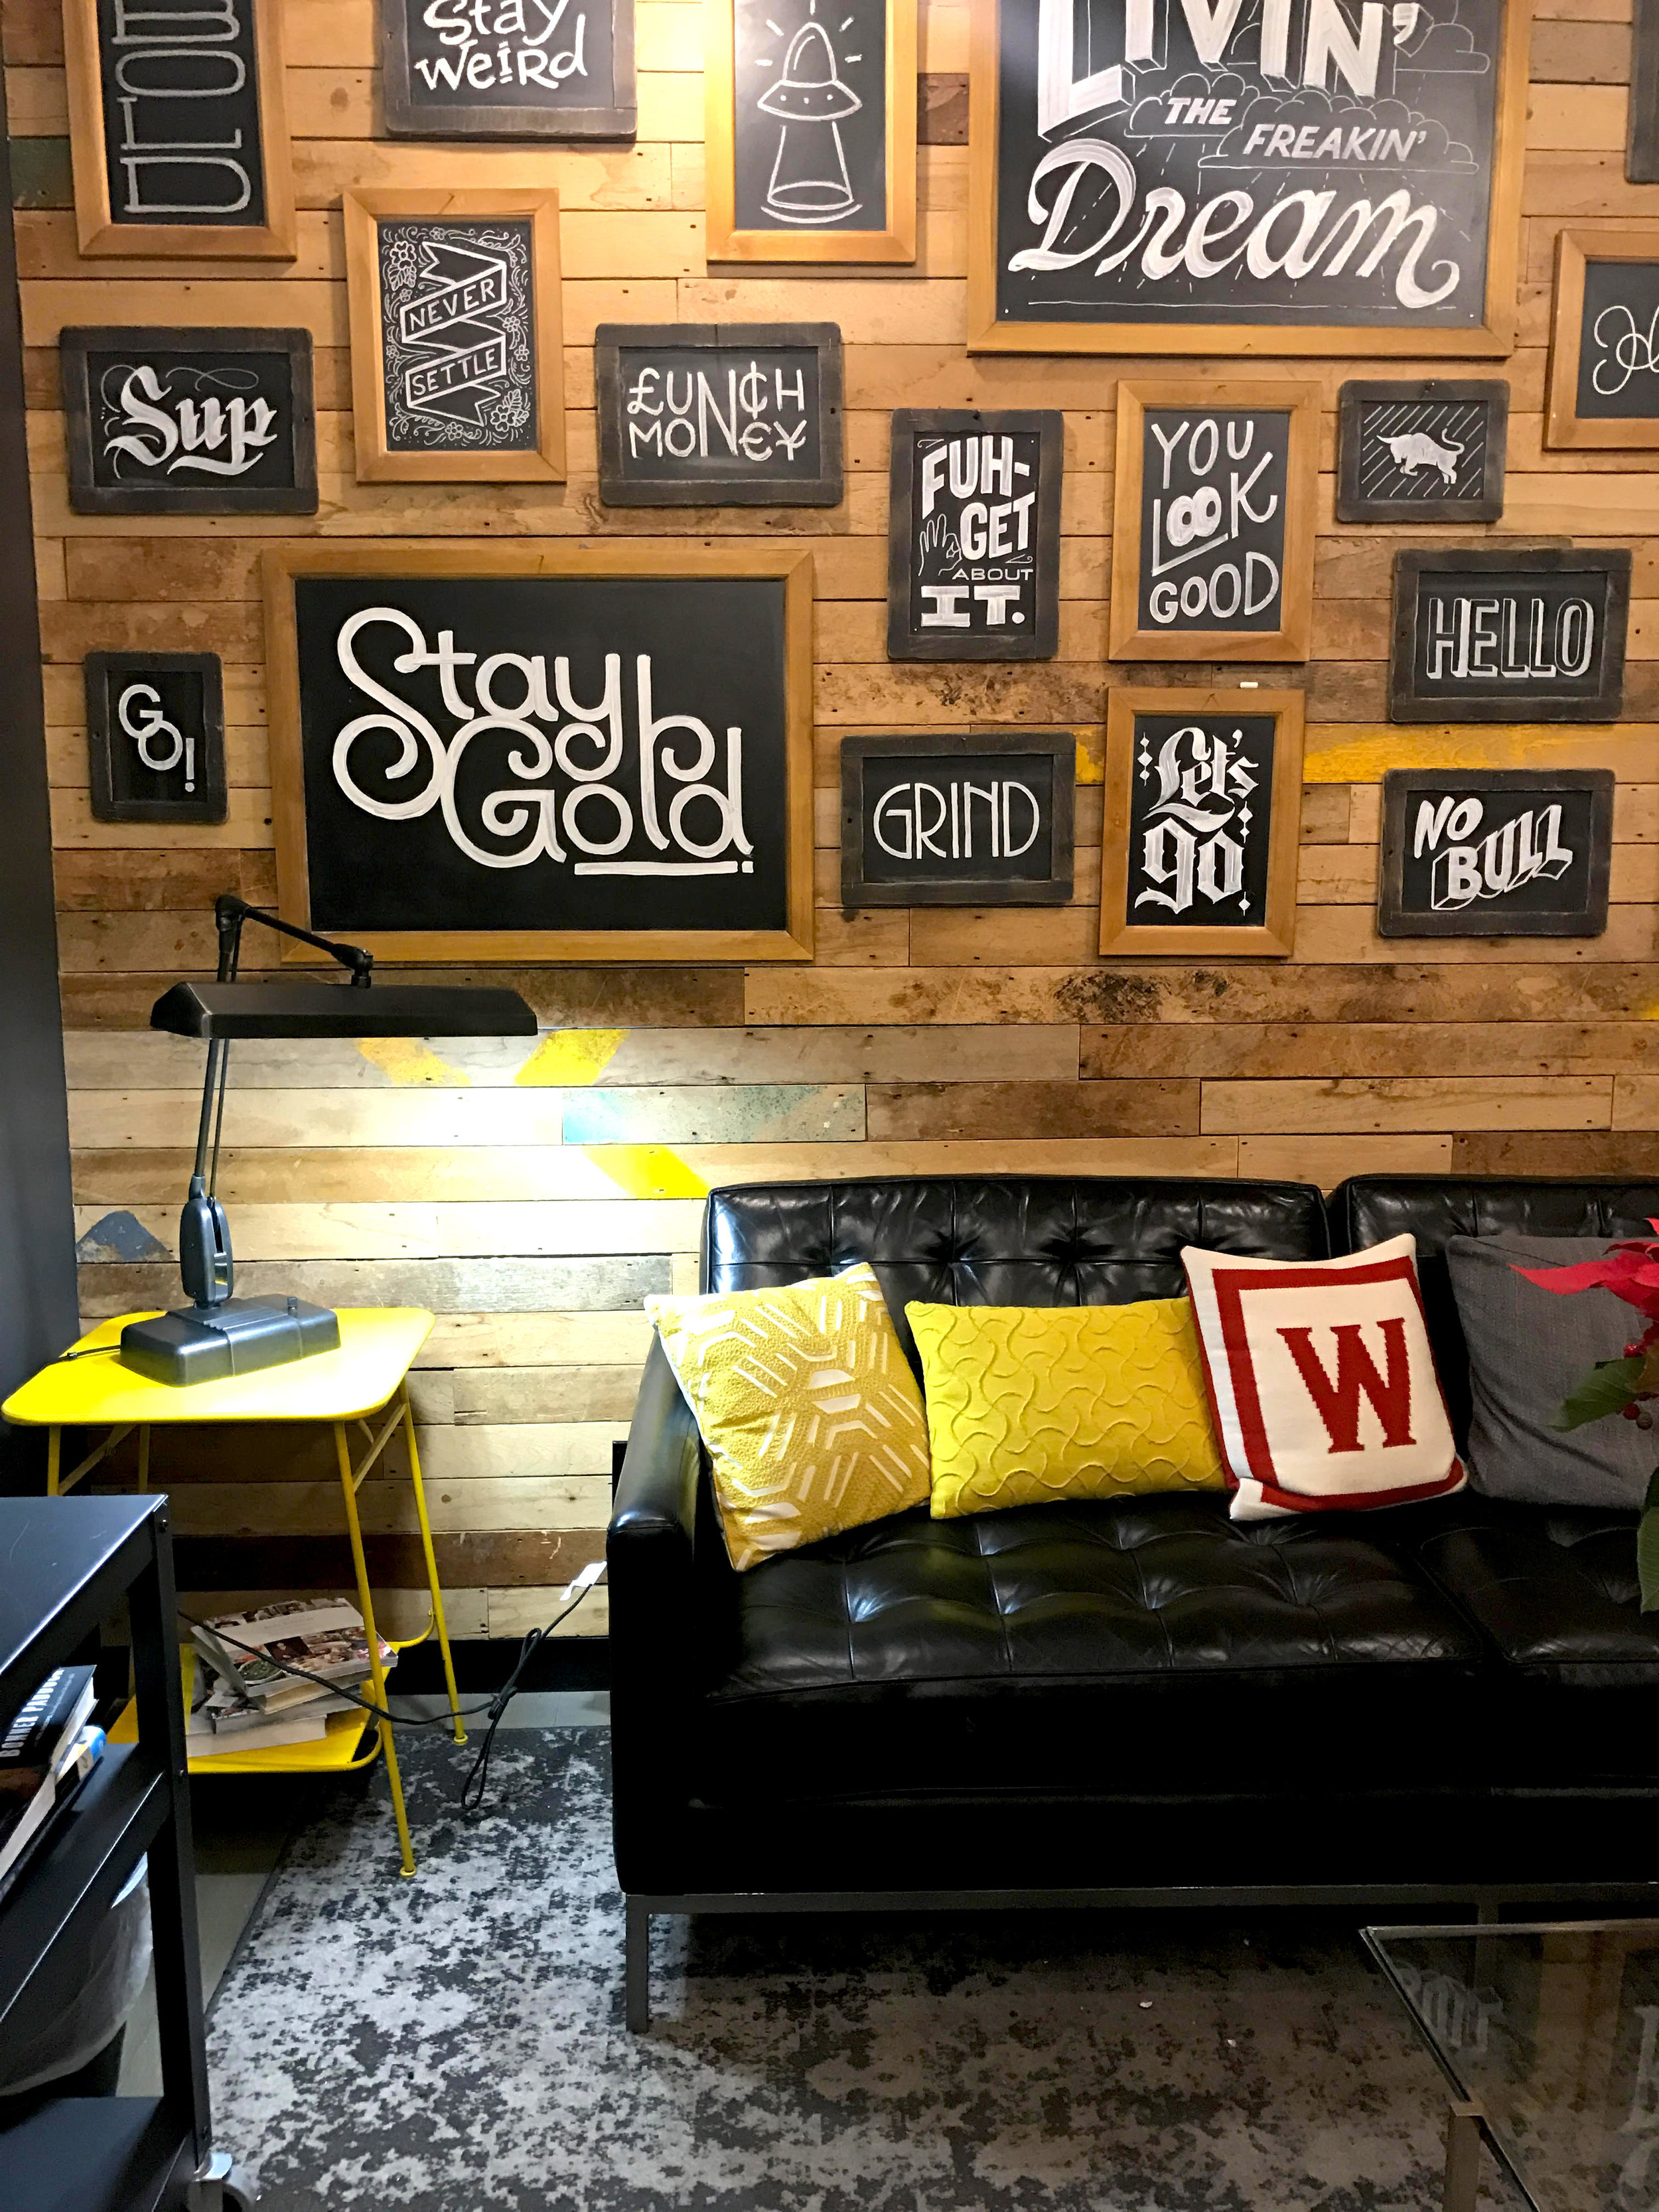
Charging Bull

This is my 'chill WeWork' location and is honestly one of my favorites because I really like the decor. The common spaces are a little smaller (and on two different levels) but there's a big couch that you can work from and the ping pong table is right next to it, which is fun. Like other locations, they also have little phone booths for you to take calls in which I recommend because this workspace is generally a little louder than others.

While these are definitely my 3 favorites so far, I can't wait each month to check out a new one(so far I've been a member for a little over a year). If you're a fellow entrepreneur or in town on business, I highly recommend checking out the WeWork NYC locations. I only have great things to say!

Apartment DIY Bathroom Edition
Anna Osgoodby Life + Design :: Apartment DIY Project Bathroom Edition -- How to Re-Grout and Re-Caulk Your Shower for Under $30

Things are about to get a little grout-y with today's DIY post! Get it?! Haha, ok ok maybe it's a little cheesy 😜. As I mentioned in my latest apartment tour blog post, our apartment needed a little TLC when we moved in. When you find an apartment in Manhattan in a great location with a backyard though, you sign that lease and commit to doing some DIY projects.. because #priorities. And let's be honest, when I say DIY projects I'm only referring to myself because while Chris has many great qualities being handy or crafty are not two of them.

Of course when you're renting there's a little bit of a limit to the things you can do. 1.) you don't own the place so you can't do anything too crazy and 2.) since you're just renting you don't want to invest too much into any projects. There are just certain things you have to do something about though and our shower definitely fit that bill. Guys.. it was nasty. Living in New York, you're living in buildings that are often pre-war and have a high turnover of renters so renovations are often few and in between because, well, they'll get rented either way. So unfortunately it's not uncommon to end up with a bathroom with moldy caulking or missing grout. Not to fear though! With a few items under $30 and some elbow grease, you too can make some improvements.

So to kick off this post we're going with some before shots and I'm warning you, they're prettyyyy scary. This is what $2.6k a month gets ya! 😂

Yeah... we definitely had to make some improvements there. So here's the dets on what you need to make some magic happen.

The Essentials for the Job:

  1. 3 in 1 Caulk Tool 
  2. Elmer's Tile Grout
  3. Silicone Caulk
  4. Polishing Sponge
  5. Plastic Dropcloth (optional)

To get started, first you want to make sure the shower is clean so that you can prep the space. Once it's clean, you'll need to chip away at the old grout to make room for the new and also remove all of the old caulking. I bought this tool and I can honestly say it was the best $5 spent on the project. This little sucker made it super easy to remove everything. Bye bye nastiness!

Anna Osgoodby Life + Design :: Apartment DIY Project Bathroom Edition -- How to Re-Grout and Re-Caulk Your Shower for Under $30

After everything had been removed, I cleaned up a bit and got ready to re-grout! I opted for a pre-mixed grout in a tube from Elmer's -- who knew they also made bathroom products! 

Anna Osgoodby Life + Design :: Apartment DIY Project Bathroom Edition -- How to Re-Grout and Re-Caulk Your Shower for Under $30

I had read some great reviews about the product online and it sounded like a less messy option and didn't require as much drying time as some of the others, so I decided to give it a go! It's not as grainy as some other grouts, but it was easy to use and got the job done so those two things were the most important parts to me.

Never grouted before? Yeah, I hadn't either, but there are a ton of Youtube videos out there. While DIYing isn't for everyone, and some things are definitely best left to the pros, this one wasn't too bad. Time-consuming but not too difficult. The video below will give you some of the basics.

The grout dries pretty quickly and then the next step is to damper your polishing sponge to wipe off the excess. The key to this is giving it enough time to dry, but not to leave it on there for too long otherwise it's a pain in the booty to get off. I found about 20 mins was a good amount of time. After I completed the grout process, I let everything sit for 12 hours per the directions. While the supplies I chose allowed for much shorter waiting times, this is definitely a weekend project.

After the grout had sat for 12 hours I moved on to the caulking process. I had used caulking before in past apartments -- clearly I can't handle yucky showers. I will say though, I used a different brand this time and I will never use another again. I highly recommend using this variety from Momentive Performance Materials. Again with the time issue, this brand only requires 3 hours before you can use your shower as opposed to other brands which usually require at least 24 hours. Caulking isn't my favorite thing to do so I definitely wanted to get it right once and not have to do it again because some peeled up because it didn't cure for long enough. This one is also great because you don't need a caulking gun. Just squeeze and go! The tool I used earlier in the project also can be used to smooth our caulking too.

After the caulking was complete, it was time to wait! The directions said 3 hours but I decided to let it sit at least 6 before using the shower. I also bought a plastic dropcloth and taped it up on the shower walls for 2 days.. Justttt to be extra careful to protect the work I just did. #OneBathroomProblems If you have another shower, you probably won't need one but I got one just as a precaution.

So how did it turn out? I'd say pretty good! It's still not perfect, but oh boy is it an improvement from how it was when we moved in!

I hope you've enjoyed this post and hopefully I can help out some fellow people dealing with some grout-y showers! If you have any questions feel free to send them my way in the comments.

Positive Vibes, Positive Life
Anna Osgoodby Life + Design :: Positive Vibes, Positive Life 4 Tips to Living a More Positive Life

If the first 10 days are any indication of how the year will go... I'M ALL IN BABYYY! Can I have a humble brag moment for a second?! Because, guys, my first week and a half of the year has been that good. 

Here are some of the highlights so far:

  • Bold & Pop biz explosionnnn! We already kicked off some brand spanking new projects that I'm SO excited to work on and our email boxes have been flooded with schduling other new projects. Gosh, I love the new year and getting to help other biz bosses make their dreams a reality!

  • Had an awesome coffee intro meeting with a fellow creative entrepreneur in the city who I just know is going to become a great new friend. One of my clients, who I also adore, made the intro and I am just so dang thankful to have such a supportive group of women in my life!

  • Got to meet one of my biggest biz role models, Melyssa Griffin! #CareerFanGirl moment. I've looked up to her so much and learned so much from her blog while building my business and it was so dang cool to meet her. She organized a local NYC bloggers + entrepreneurs meet-up while she was visiting the city and it was SO awesome! Normally going to an event like that would kind of scare the crap out of me but, I put on my big girl pants and met an awesome group of like-minded goal chasers! We had so much fun getting to know each other that we're even going to start regular meet-ups. Woop, woop!

and then just some extra awesome bonuses

  • The Seahawks won their first playoff game!

  • We had our first surprise snow storm of the year

  • I picked up some super cute new office supplies -- yes there are donuts and pineapple designs involved

  • anddd the Second Avenue subway opened (YES really!) and I rode it... and it's more awesome than I thought it would be.

If there's one thing I can say.. it is that the positive vibes are a-flowing! I'm such believer in the power of a positive attitude and plan on lighting them off like fireworks this year! 💥 Is every day going to be full of glitter, ice cream, and ponies?! Of course not -- although it would be cool if it was! The point is, the way we approach things can have such a profound effect on the path our days and then ultimately months and years turn out. Put positive vibes out there and get positive vibes in return! Having a positive attitude isn't about always find the good in the bad either, because let's be real here... sometimes life will deal us some really crappy cards and things will just downright fall apart. Instead, it's about never forgetting all that you are thankful for even in the darkest times and using that as strength to continue on your journey. You know the one thing that the good and bad times have in common..? Neither last forever so this year let's all work on spreading a little more positive vibes -- because the world could really use a lot more of that right now.

So what is my advice on keeping the good vibes rolling? Here are 4 things I'm working on this year.

Setting Intention Goals

This year I went to town on my yearly goals -- both for biz and personal -- and keeping them at front of mind is key for me this year. So what does living with intention really mean? Well, something I did this year was pick a word to help define what I want this year to mean. Followed by picking a different work for each month. Each word focuses on a different part of my life or goals that I want to shine a spotlight on for the 28-31 days each month. This is also about focusing on the things that matter most in life. I'm definitely a goal-hustler, but life is more than just accomplishing goals. Living with intention is all about putting your full heart and soul into each thing you do and really giving it your all instead spreading yourself too thin and then disappointing yourself when you can't do everything. 

Creating a Vision Board

Adding on to living with intention, this is the first year I created a vision board. While I've had some digital versions before and I usually write down my yearly goals, I've never done a full-on vision board until this year. My vision board is all about capturing those positive vibes -- those feel-good emotions you're flooded with when you nail one of your goals. I wanted to create a board that gave me that kick of inspiration every time I looked at it. Why do so many people fail to keep up with their new year's resolutions and goals? 1.) Because it's not a part of our habits already and making changes are fricking hard and 2.) Because piggy-backing off of not being a part of our habits, it's easy to push them aside and forget about them. It's become the norm to give up on them so we don't give ourselves a hard time. Well, it's a little harder to forget when they're staring you right in the face each and every day which is why I love my vision board. It's a constant reminder of how far I've come, where I'm going and tangible goals I want to cross off. If you want to join in on the vision board party I also wrote a blog post on this if you are looking for some tips on why they can be powerful and how to create one.

Prioritizing the Positive

This year I'm really focused on trimming negativity from my life. Sometimes you just have to take a look at the forces in your life and evaluate what is good and what isn't for your well-being. Sometimes that is relationships you have, your career path, where you live.. the list goes on and on. If something doesn't feel good anymore and is bringing you down more than bringing you up, then it might be time to close that chapter -- even when it's hard. You know how they say when one door closes, another opens?! Well same goes for this. 

Letting Go of Guilt for Saying No

This one is a tough one for me.. (as I'm sure a lot of you!) While "no" can be looked at as a negative word sometimes, I'm flipping that on its head. While I still plan on saying YES to a lot of amazing things, I'm working on not feeling guilty about the things I say no to. The truth is there are only so many hours in the day and one thing I am guilty of is trying to do everything. I'm learning that it's okay to say no without any other reason than you're not feeling it. We all need some rest and the reality is we can't be everywhere all of the time. I would rather commit to one after work event a week and be fully present and excited about that engagement, than be burnt out each day because I committed to 4 events that week. I want to feel good about all of the things I say yes to and that means finding my limits and being honest about the things I can give my full attention. Now this does not mean to bail last minute on your friend's happy hour because you're tired. Guys, that's crappy and one of my biggest pet peeves. The key to living with intention is honoring your word from the beginning. Either commit or don't, but make that decision and stick to it.

I hope you've found some of these tips helpful! I know I've already said it a million times but I'm so excited for so much that 2017 is going to bring and I hope you are too!